Daring Bakers, September: Croissants

The Daring Bakers go retro this month! Thanks to one of our very talented non-blogging members, Sarah, the Daring Bakers were challenged to make Croissants using a recipe from the Queen of French Cooking, none other than Julia Child!

Thanks to the rare combination of an early bust of ambition and a 3-day weekend at the very beginning of the month, I charged right into this recipe! And therefore missed the corrected version of the recipe in which the original 3 and a quarter cups of flour was changed to the correct amount of 1 and three-quarter cups of flour. That said, my croissants look a bit anemic. Or I guess I could be kind and call them "fit and trim." Which is what I want to be some day when I grow up, which is why I didn’t want to remake the recipe again to make an entirely new batch of croissants in the house. So!

I will say that this is an instance where I should’ve trusted my instincts. The first cooking class I ever took was on laminated dough—puff pastry—and it included croissants. Since then, I’ve made all sorts of puff pastry, so I should’ve known when the initial dough came out stiff and shaggy instead of soft and pliable that something was amiss.

I like to give recipes a chance, though, instead of dismissing them right off the bat, so I soldiered on and carried the recipe through.

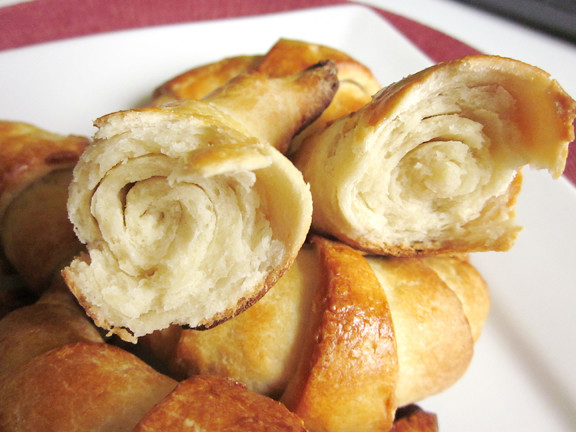
Although the resulting croissants were more like crescent rolls than croissants, they still had really good flavor, even if the texture wasn’t what I’d hoped. This recipe’s mechanics were pretty much the same.
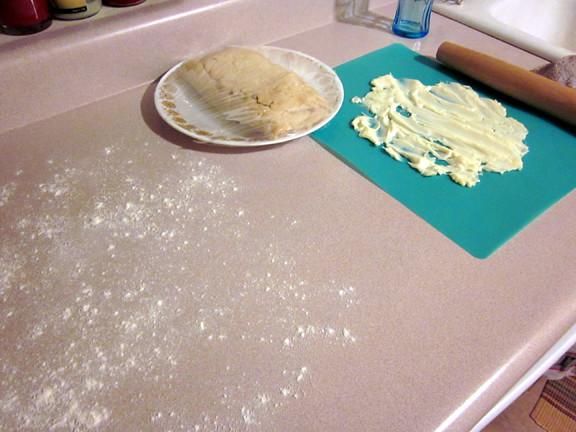
This recipe had me pounding out the butter on a cutting board while it was still cold to keep it cold, but make it spreadable. Usually, I spread softened butter onto parchment into the size and shape I need, fold the parchment over it to protect it while it’s chilling, then, when I need it, I take the butter block out and put it out onto my rolled-out dough, then encase it as this recipe directs.
I’ve almost always had an oozing butter problem, no matter how cold I’ve kept the butter, and it would come out just like toothpaste.
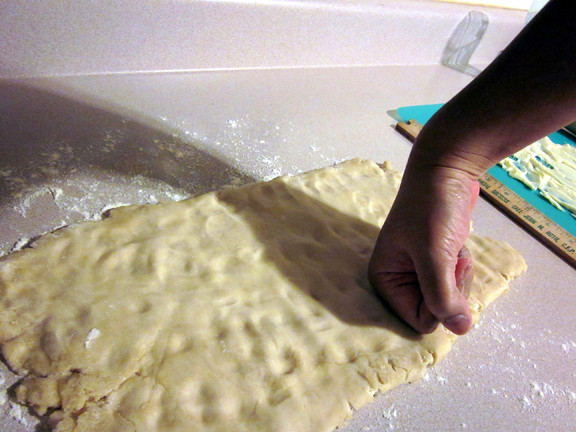 This was especially problematic with this dough, which was so stiff that I had to use my fist to manhandle it to form it into the starting rectangle.
On warm days, I’ve had to chill the dough in the fridge after each fold, but a smoosh of butter still usually manages to come out somewhere, usually around the ends. When that happens, I just dust out some flour over the oozing butter to at least keep my rolling pin a little tidier and to sort of "mat up" the butter a bit.
Any butter that does ooze, out, I just spread it back onto the dough and fold it in with the next fold. After about a handful of folds, the butter’s distributed throughout so thinly that there isn’t enough to ooze.
After folding and rolling several times so that you get a billion delicious alternating layers of dough and butter, you roll the dough out one last time and slice it into rectangles.
I learned that rolling and pulling the triangles out a bit will help the croissants keep their form and come together tightly (although that didn't quite work with the stiff dough, so each layer's still pretty separate).
Another hint that something was wrong with this dough was how difficult a time it had with each rise. usually, these risen croissants would've been three times the size, but they barely went anywhere.
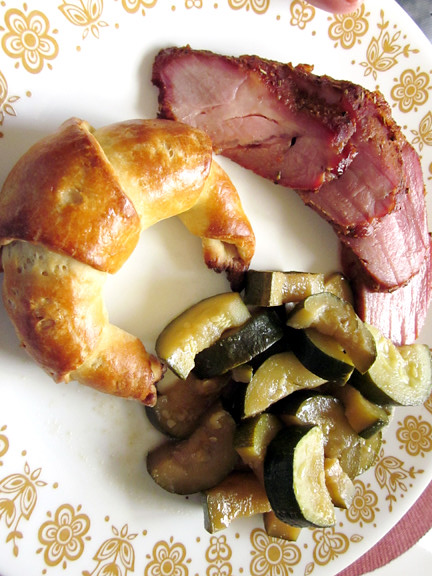
I was hoping for giant air pockets, which signify an airy, buttery, melt-in-your-mouth crumb that lingered beneath the croissants crust. We ended up with some tasty snacky crescent rolls that went well with our smoked pork loin and garden-fresh zucchini, instead. ;)
Hey, I'll take it! Try the recipe with the corrected amount of flour, and you'll probably end up with an awesome croissant. Because this month's hostess isn't a blogger, I can't direct you to her blog where the recipe will be posted. While I don't typically post copyrighted material in my blog, I'll do so here, for you baking pleasure.
**********
Note: The most difficult part of making croissants is that they take a veeeeery long time. About 12 hours total, with resting and rising periods. However, at certain points you can leave it overnight. I have done the recipe twice – once over three days, and once in 12 hours. Both worked out well.
Mandatory Items: You must make a batch of croissants according to the recipe below.
Variations allowed: I highly recommend trying the originals at least once, but you are free to be as creative as you want. Chocolate and almond croissants are popular . . . . let your imagination run wild!
Preparation time: In total, 12 hours.
Making dough, 10 mins
First rise, 3 hours
Kneading and folding, 5 mins
Second rise, 1.5 hours (or overnight in the fridge)
Rolling in the butter (turns one and two), 15 mins
First rest, 2 hours
Turns three and four, 10 mins
Second rest, 2 hours (or overnight in the fridge)
Forming croissants, 30 mins
Final rise, 1 hour (or longer in the fridge)
Baking, 15 mins
Equipment required:
• Measuring cups
• Measuring spoons
• Mixing bowls of numerous sizes
• Rubber spatula
• Plastic bag
• Pastry scraper
• Counter space or board for rolling and kneading
• Rolling pin
• Plastic wrap
• Baking tray
Croissants
Servings: 12 croissants
Note from Lis: Sarah took so many gorgeous and helpful step-by-step photos for this challenge, that I found the best way to display them is at the bottom of the recipe. Each photo is notated with what you are looking at. Smile
Ingredients
¼ oz (7 gm) of fresh yeast, or 1¼ teaspoon (6¼ ml/4 gm) of dry-active yeast (about ½ sachet)
3 tablespoons (45 ml) warm water (less than 100°F/38°C)
1 teaspoon (5 ml/4½ gm) sugar
1 3/4 cups (225 gm/½ lb) of strong plain flour (I used Polish all-purpose flour, which is 13% protein)
2 teaspoons (10 ml/9 gm) sugar
1½ teaspoon (7½ ml/9 gm) salt
½ cup (120 ml/¼ pint) milk (I am not sure if the fat content matters. I used 2%)
2 tablespoons (30 ml) tasteless oil (I used generic vegetable oil)
½ cup (120 ml/1 stick/115 gm/¼ lb) chilled, unsalted butter
1 egg, for egg wash
Directions:
1. Mix the yeast, warm water, and first teaspoon of sugar in a small bowl. Leave aside for the yeast and sugar to dissolve and the yeast to foam up a little.
2. Measure out the other ingredients
3. Heat the milk until tepid (either in the microwave or a saucepan), and dissolve in the salt and remaining sugar
4. Place the flour in a large bowl.
5. Add the oil, yeast mixture, and milk mixture to the flour
6. Mix all the ingredients together using the rubber spatula, just until all the flour is incorporated
7. Turn the dough out onto a floured surface, and let it rest a minute while you wash out the bowl
8. Knead the dough eight to ten times only. The best way is as Julia Child does it in the video (see below). It’s a little difficult to explain, but essentially involves smacking the dough on the counter (lots of fun if you are mad at someone) and removing it from the counter using the pastry scraper.
9. Place the dough back in the bowl, and place the bowl in the plastic bag
10. Leave the bowl at approximately 75°F/24°C for three hours, or until the dough has tripled in size.
11. After the dough has tripled in size, remove it gently from the bowl, pulling it away from the sides of the bowl with your fingertips.
12. Place the dough on a lightly floured board or countertop, and use your hands to press it out into a rectangle about 8 by 12 inches (20cm by 30cm).
13. Fold the dough rectangle in three, like a letter (fold the top third down, and then the bottom third up)
14. Place the dough letter back in the bowl, and the bowl back in the plastic bag.
15. Leave the dough to rise for another 1.5 hours, or until it has doubled in size. This second rise can be done overnight in the fridge
16. Place the double-risen dough onto a plate and cover tightly with plastic wrap. Place the plate in the fridge while you prepare the butter.
17. Once the dough has doubled, it’s time to incorporate the butter
18. Place the block of chilled butter on a chopping board.
19. Using the rolling pin, beat the butter down a little, till it is quite flat.
20. Use the heel of your hand to continue to spread the butter until it is smooth. You want the butter to stay cool, but spread easily.
21. Remove the dough from the fridge and place it on a lightly floured board or counter. Let it rest for a minute or two.
22. Spread the dough using your hands into a rectangle about 14 by 8 inches (35 cm by 20 cm).
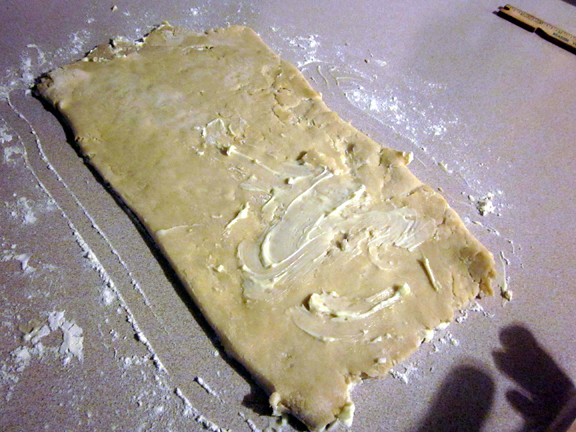
23. Remove the butter from the board, and place it on the top half of the dough rectangle
24. Spread the butter all across the top two-thirds of the dough rectangle, but keep it ¼ inch (6 mm) across from all the edges.
25. Fold the top third of the dough down, and the bottom third of the dough up.
26. Turn the dough package 90 degrees, so that the top flap is to your right (like a book).
27. Roll out the dough package (gently, so you don’t push the butter out of the dough) until it is again about 14 by 8 inches (35 cm by 20 cm).
28. Again, fold the top third down and the bottom third up.
29. Wrap the dough package in plastic wrap, and place it in the fridge for 2 hours. 30. After two hours have passed, take the dough out of the fridge and place it again on the lightly floured board or counter.
31. Tap the dough with the rolling pin, to deflate it a little
32. Let the dough rest for 8 to 10 minutes
33. Roll the dough package out till it is 14 by 8 inches (35 cm by 20 cm).
34. Fold in three, as before
35. Turn 90 degrees, and roll out again to 14 by 8 inches (35 cm by 20 cm).
36. Fold in three for the last time, wrap in plastic, and return the dough package to the fridge for two more hours (or overnight, with something heavy on top to stop it from rising)
37. It’s now time to cut the dough and shape the croissants
38. First, lightly butter your baking sheet so that it is ready
39. Take the dough out of the fridge and let it rest for ten minutes on te lightly floured board or counter
40. Roll the dough out into a 20 by 5 inch rectangle (51 cm by 12½ cm).
41. Cut the dough into two rectangles (each 10 by 5 inches (25½ cm by 12½ cm)) (Photo 24)
42. Place one of the rectangles in the fridge, to keep the butter cold
43. Roll the second rectangle out until it is 15 by 5 inches (38 cm by 12½ cm).
44. Cut the rectangle into three squares (each 5 by 5 inches (12½ cm by 12½ cm))
45. Place two of the squares in the fridge
46. The remaining square may have shrunk up a little bit in the meantime. Roll it out again till it is nearly square
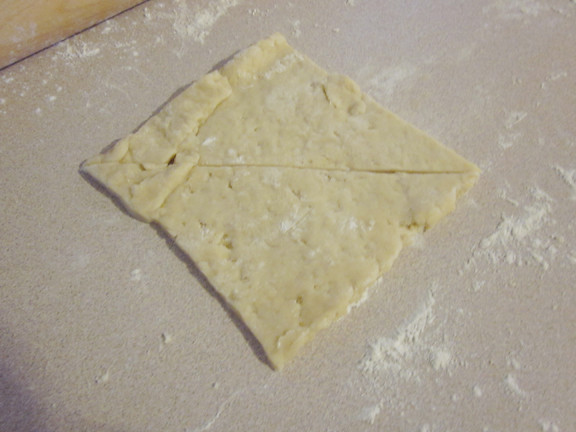
47. Cut the square diagonally into two triangles.
48. Stretch the triangle out a little, so it is not a right-angle triangle, but more of an isosceles.
49. Starting at the wide end, roll the triangle up towards the point, and curve into a crescent shape.
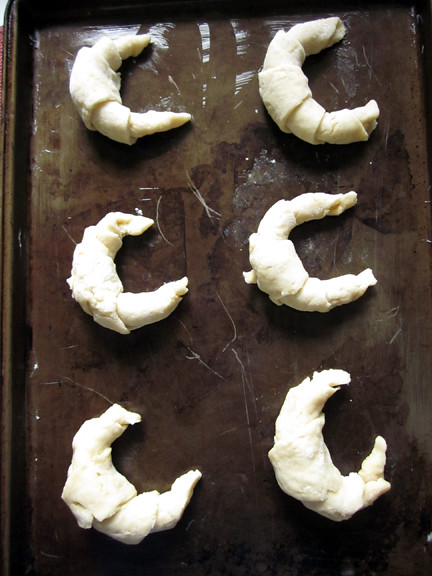
50. Place the unbaked croissant on the baking sheet
51. Repeat the process with the remaining squares of dough, creating 12 croissants in total.
52. Leave the tray of croissants, covered lightly with plastic wrap, to rise for 1 hour
53. Preheat the oven to very hot 475°F/240°C/gas mark 9.
54. Mix the egg with a teaspoon of water
55. Spread the egg wash across the tops of the croissants.
56. Put the croissants in the oven for 12 to 15 minutes, until the tops are browned nicely
57. Take the croissants out of the oven, and place them on a rack to cool for 10 minutes before serving.
Storage & Freezing Instructions/Tips:
Croissants are best eaten the day they are made. They will survive till the next day in a sealed container. If they seem a little stale, they can be quickly re-freshed by warming them in the oven.(((Julie's Notes: Croissants, like most baked goods, do fine frozen and then reheated in the oven or even zapped in the microwave for 30 to 60 seconds. You could also freeze your dough before you roll it out for the final time and form it into croissants.)))
Additional Information:
Check out this video of Julia Child making her own croissants (note that the recipe she follows here is a little different from the one in the book, but it’s still fun and helpful to watch) http://www.youtube.com/watch?v=XfygewLUAmo&feature=related
More on Julia’s croissants with gorgeous photos http://www.mamaliga.com/desserts/croissants-a-la-julia-child
Here is a recipe for vegan croissants – it looks like you can just substitute margarine and soy milk http://zeats.wordpress.com/2008/02/25/vegan-croissantspain-au-chocolat/
**********
Check out my fellow DBers' croissants through our blogroll!


Comments
ceecee
And that's why I learned the daring bakers, to learn. So thank you for that (and by the way they still look great though).