Daring Bakers, October: Pizza and Toppings

It's time for this month's installment of the Daring Baker's challenge! Every month, the assigned host delivers a secret recipe to all the DBers around the world, and at the end of the month, the DBers post the results on their blogs. This month, host Rosa chose Peter Reinhart’s basic pizza dough from his book, The Bread Baker’s Apprentice. The recipe is on Rosa's blog here, along with gluten-free instructions. We were allowed to use whatever sauce and toppings we wanted, as long as we used both sauce and toppings. Another rule—we HAD to toss at least one of our pizza crusts, as in death-defyingly up in the air, hopefully not straight into air vents, into ceiling fans, light fixtures, or another overhead obstacles, like the ceiling itself.
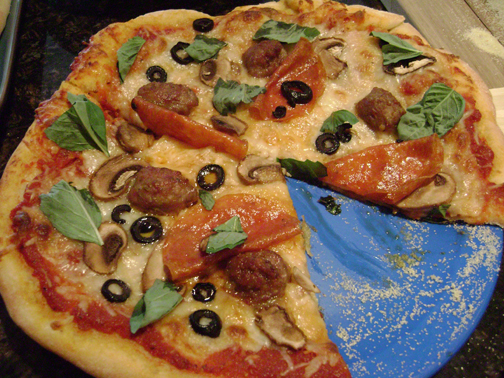
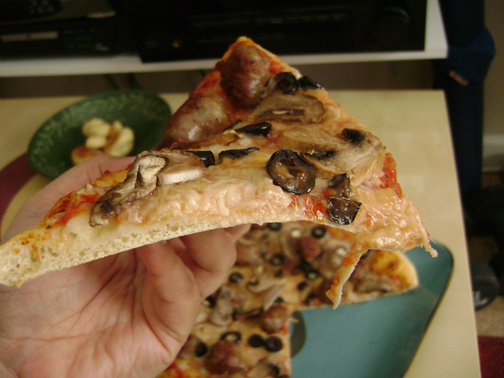
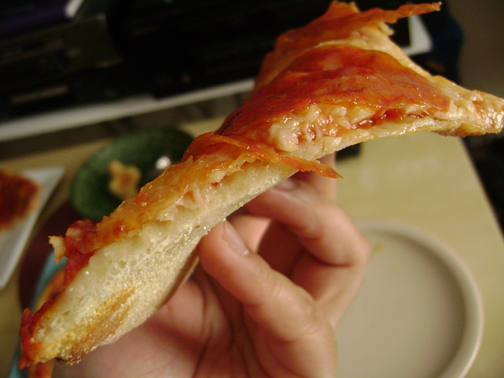
Here's a shot of my "everything" pizza--a little bit of all the leftover ingredients from the other pizzas--basil, pepperoni, sausage, mushrooms, black olives, and different cheeses on homemade tomato sauce:
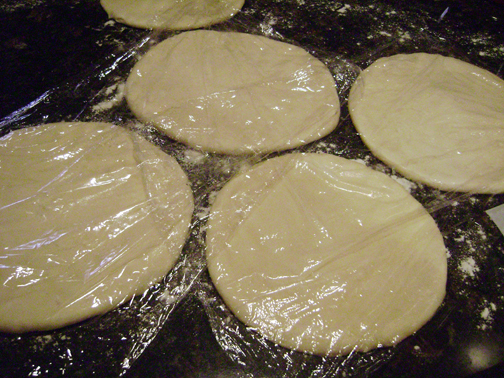
The dough came together easily with an overnight rest, and I flattened my five of my six dough balls out to rest before tossing them. Six pizzas (kinda)! It was a pizza frenzy. Not as exciting as like a piranha frenzy, but far tastier (for the peoples, anyway):
The sixth dough, I decided to play with, making garlic butter knots. Yum! Here are the raw knots rising:

And the baked knots:
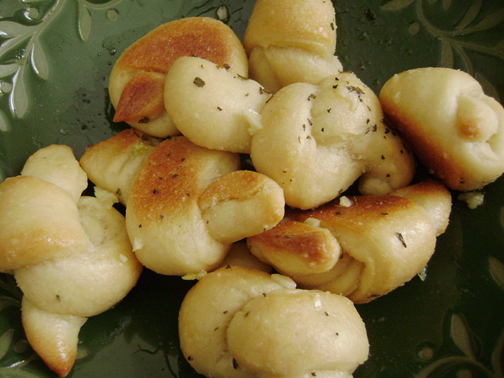
Cinnamon and sugar would've made for a nice dessert knot.
I decided to toss all of my doughs for pizzas instead of just the one that Rosa required. It took a bit of working out . . .

Kudos to Hun for being the photographer for this travesty! ;)
. . . but by the last pizza, I’d figured out the dynamics!
I dedicate my decent tosses to my cooking/fooding/blogging buddy, Ken, who can toss a mean pizza!
Pizza sauce does not have to come from a jar. Channeling my mom’s old “on the spot” spaghetti sauce, I make my own red sauces. Everyone can recognize that pizza sauce is basically tomato sauce, but somehow, not everyone realizes that just up the aisle from the jarred pasta sauces, you can find cans of tomatoes in varying states of “not on the vine,” from whole, peeled tomatoes to the reduced tomato paste. For the thick tomato sauce, I use canned tomato sauce, making sure it’s low sodium so I can add my own amount of salt. It’s not as watery as chopped or diced tomatoes, so you don’t have to worry about it soaking out your pizza. Basically, I sizzle up some garlic, salt, and oregano or basil, add the can of sauce (two 28-ounce cans, in this case), and add a splash of liquor (I had some marsala around for some tiramisu cheesecake I’d made earlier). Cook it down to concentrate the flavors (in other words, until it tasted “right”), seasoned to taste, and ladled it onto my pizzas.
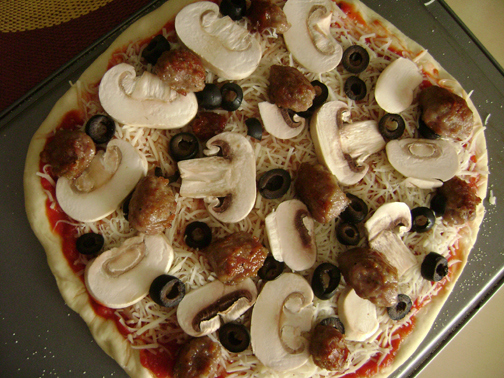
My first pizza used my favorite toppings, sausage, black olives, and mushrooms with asiago, mozzarella, and parmesan cheeses:

I'm a thin-crust gal, totally, unless it's Chicago-style pizza, and therefore, artery-clogging. I think if I'd made my crust thicker, it would've developed some nicer air pockets. As it is, I'm happy with how light this turned out:
Okay, in a home oven, pizza upskirt shots aren't as exciting as they are in brick oven pizzas, but this doesn't do the good crust justice:

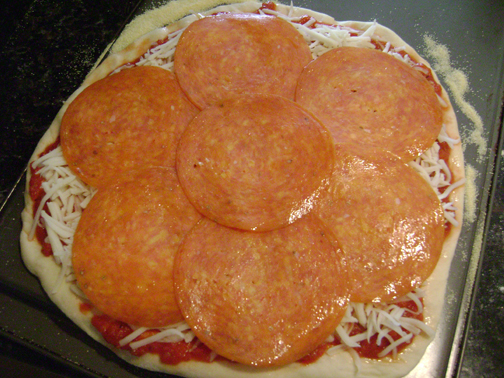
Next came pepperoni, but not this ridiculous little pepperonis—real REAL pepperoni, with mozzarella cheese:
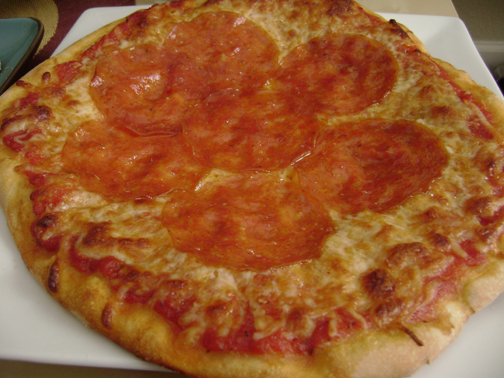
I'm not sure if the pepperoni shrunk up and away from the edges, or if they just slid toward the center because I put them on a concave (square) plate. Maybe a little of both.
Tossing really does make for a good, uniform shape (which most of the pizzas lost when trying to fling it from the cookie sheet onto the stone), size, and thickness:
And baking it a few minutes longer make for a bit more crisp to the crust:

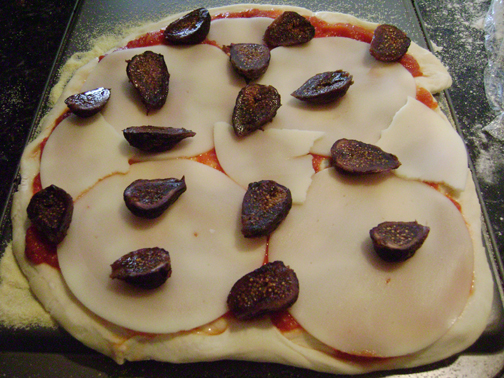
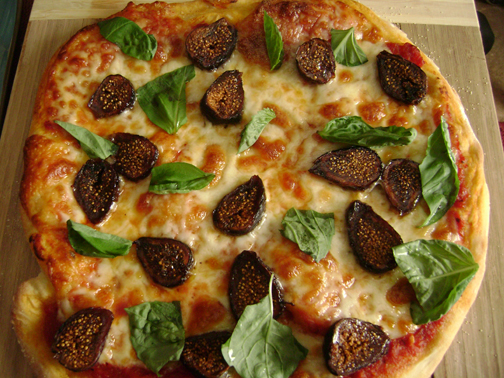
I made a sweeter treat pizza using figs and provolone, adding torn basil after removing the pizza from the oven—don’t bake it with the basil because the basil will just turn brown or black, withering away to ickiness:
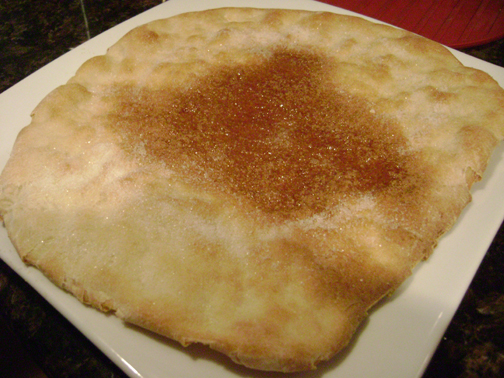
And the last crust, I baked with no sauce—just a sprinkle of cinnamon and sugar, baking it until it was wonderfully crispy. I mixed some local honey and whipped cream cheese, spread it on, added some sliced organic strawberries, and drizzled a little more honey over it:
Strawberry pizza is often made with a shortbread crust, but truth be told, I like this pizza tart better—it paid more homage to the strawberries than to the usually oversweet and buttery crust, and the crust was cracker crisp instead of cookie crumbly:

I loved this month's project. The dough was the easiest and most low-maintenance pizza dough I've made, and tossing was a lot of fun! My favorite for taste is still the bianco (yup, it's thick crust, but its very crispy bottom and good flavor made it one of those handfuls of exceptions). Maybe one day, I'll hold a pizza party like the one I held with some of my awesome food-loving friends using this dough recipe!
Check out my fellow DBers’ fabulous pizzas over at our blogroll!
BASIC PIZZA DOUGH
Original recipe taken from “The Bread Baker’s Apprentice” by Peter Reinhart.
Makes 6 pizza crusts (about 9-12 inches/23-30 cm in diameter).
Ingredients:
4 1/2 Cups (20 1/4 ounces/607.5 g) Unbleached high-gluten (%14) bread flour or all purpose flour, chilled
1 3/4 Tsp Salt
1 Tsp Instant yeast
1/4 Cup (2 ounces/60g) Olive oil or vegetable oil (both optional, but it’s better with)
1 3/4 Cups (14 ounces/420g or 420ml) Water, ice cold (40° F/4.5° C)
1 Tb sugar - FOR GF use agave syrup
Semolina/durum flour or cornmeal for dusting
DAY ONE
Method:
1. Mix together the flour, salt and instant yeast in a big bowl (or in the bowl of your stand mixer).
2. Add the oil, sugar and cold water and mix well (with the help of a large wooden spoon or with the paddle attachment, on low speed) in order to form a sticky ball of dough. On a clean surface, knead for about 5-7 minutes, until the dough is smooth and the ingredients are homogeneously distributed. If it is too wet, add a little flour (not too much, though) and if it is too dry add 1 or 2 teaspoons extra water.
NOTE: If you are using an electric mixer, switch to the dough hook and mix on medium speed for the same amount of time.The dough should clear the sides of the bowl but stick to the bottom of the bowl. If the dough is too wet, sprinkle in a little more flour, so that it clears the sides. If, on the contrary, it clears the bottom of the bowl, dribble in a teaspoon or two of cold water.
The finished dough should be springy, elastic, and sticky, not just tacky, and register 50°-55° F/10°-13° C.
3. Flour a work surface or counter. Line a jelly pan with baking paper/parchment. Lightly oil the paper.
4. With the help of a metal or plastic dough scraper, cut the dough into 6 equal pieces (or larger if you want to make larger pizzas).
NOTE: To avoid the dough from sticking to the scraper, dip the scraper into water between cuts.
5. Sprinkle some flour over the dough. Make sure your hands are dry and then flour them. Gently round each piece into a ball.
NOTE: If the dough sticks to your hands, then dip your hands into the flour again.
6. Transfer the dough balls to the lined jelly pan and mist them generously with spray oil. Slip the pan into plastic bag or enclose in plastic food wrap.
7. Put the pan into the refrigerator and let the dough rest overnight or for up to thee days.
NOTE: You can store the dough balls in a zippered freezer bag if you want to save some of the dough for any future baking. In that case, pour some oil (a few tablespooons only) in a medium bowl and dip each dough ball into the oil, so that it is completely covered in oil. Then put each ball into a separate bag. Store the bags in the freezer for no longer than 3 months. The day before you plan to make pizza, remember to transfer the dough balls from the freezer to the refrigerator.
DAY TWO
8. On the day you plan to eat pizza, exactly 2 hours before you make it, remove the desired number of dough balls from the refrigerator. Dust the counter with flour and spray lightly with oil. Place the dough balls on a floured surface and sprinkle them with flour. Dust your hands with flour and delicately press the dough into disks about 1/2 inch/1.3 cm thick and 5 inches/12.7 cm in diameter. Sprinkle with flour and mist with oil. Loosely cover the dough rounds with plastic wrap and then allow to rest for 2 hours.
9. At least 45 minutes before making the pizza, place a baking stone on the lower third of the oven. Preheat the oven as hot as possible (500° F/260° C).
NOTE: If you do not have a baking stone, then use the back of a jelly pan. Do not preheat the pan.
10. Generously sprinkle the back of a jelly pan with semolina/durum flour or cornmeal. Flour your hands (palms, backs and knuckles). Take 1 piece of dough by lifting it with a pastry scraper. Lay the dough across your fists in a very delicate way and carefully stretch it by bouncing it in a circular motion on your hands, and by giving it a little stretch with each bounce. Once the dough has expanded outward, move to a full toss.
NOTE: Make only one pizza at a time.
During the tossing process, if the dough tends to stick to your hands, lay it down on the floured counter and reflour your hands, then continue the tossing and shaping.
In case you would be having trouble tossing the dough or if the dough never wants to expand and always springs back, let it rest for approximately 5-20 minutes in order for the gluten to relax fully,then try again.
You can also resort to using a rolling pin, although it isn’t as effective as the toss method.
11. When the dough has the shape you want (about 9-12 inches/23-30 cm in diameter - for a 6 ounces/180g piece of dough), place it on the back of the jelly pan, making sure there is enough semolina/durum flour or cornmeal to allow it to slide and not stick to the pan.
12. Lightly top it with sweet or savory toppings of your choice.
NOTE: Remember that the best pizzas are topped not too generously. No more than 3 or 4 toppings (including sauce and cheese) are sufficient.
13. Slide the garnished pizza onto the stone in the oven or bake directly on the jelly pan. Close the door and bake for abour 5-8 minutes.
NOTE: After 2 minutes baking, take a peek. For an even baking, rotate 180°.
If the top gets done before the bottom, you will need to move the stone or jelly pane to a lower shelf before the next round. On the contrary, if the bottom crisps before the cheese caramelizes, then you will need to raise the stone or jelly.
14. Take the pizza out of the oven and transfer it to a cutting board or your plate. In order to allow the cheese to set a little, wait 3-5 minutes before slicing or serving.


Comments
Cheers,
Rosa
Congratulations on your amazingly well done challenge!!!